Embroidery Stitches Sampler Book Part 1
The idea of an embroidery stitches sampler book came to me during the winter of 2017 I was looking at various embroidery sites for stitches when I was making my embroidered crystal grids (see the Various Crafts gallery). I came across Maya Matthew’s Million Little Stitches site. I loved her stitch samplers being turned into an “embroidery stitches sampler book”. What a cool idea! I do not have enough bare walls to hang anything and the idea you can look through your samplers to decide on a stitch was a great concept to me. I read that she was part of the Pin Tangle’s TAST (Take a Stitch Tuesdays) group ( https://pintangle.com/tast-faq/) . I signed up to TAST for 2018. Stitching is good exercise for the fingers, good for the creative mind and relearning this craft is a plus for me.
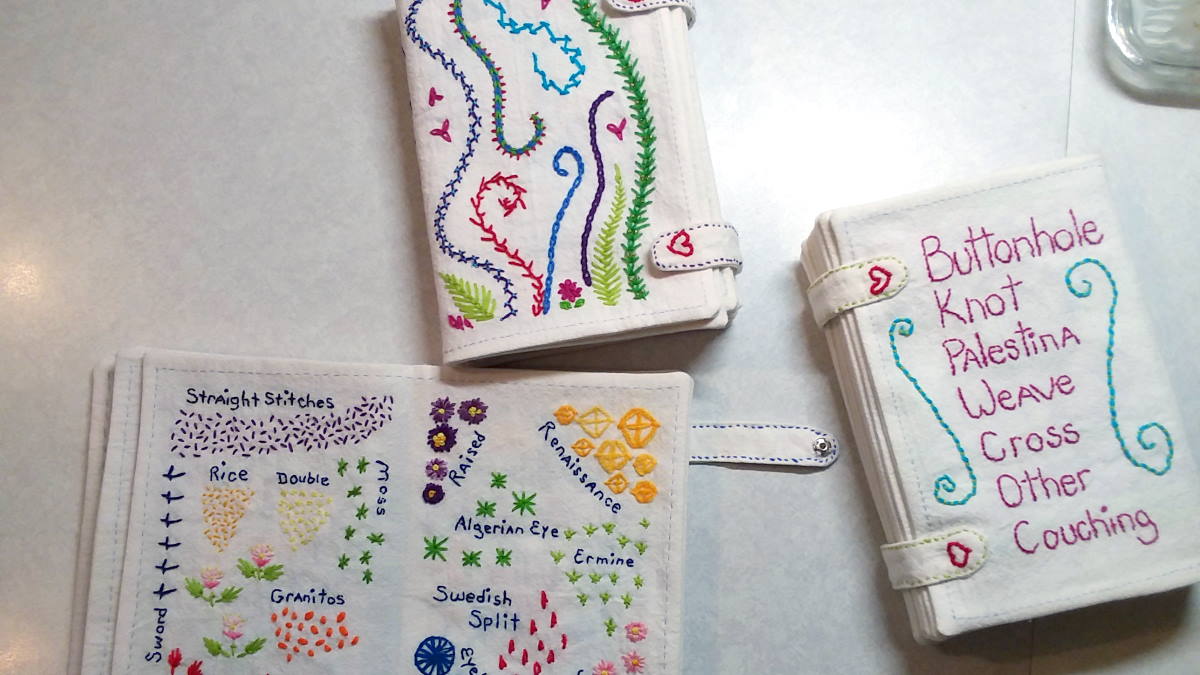
I decided I wanted to make a book like Maya’s, but one that had ALL of the stitches I could find from Pin Tangle’s site, (she has an excellent stitch dictionary and instructions with photos for each stitch), and any not included on the site from my stitchery books. I listed all of the stitches, sorting them into stitch groups. Do note: Blanket stitch is now called Buttonhole stitch. When I was stitching the name next to my little sample, I went with the shorter word at times. So frown at me for being “incorrect”, I know to look for buttonhole in the book indexes.
I knew there would be stitches I would not enjoy doing. It is natural. Filling a 4″ x 6″ space with one stitch that I did not like to do after a short time would not work for me. It would make the whole thing a chore. Also, there is the fact that there are 382 stitches on my list. Woof. That would make a very thick tome too thick to look through.
What I decided to do instead was to make pages with 3 or more stitches from a group. The first stitch, Running stitch, was the only stitch that got one page to itself. It is the most-used stitch for many things, including quilting and sewing. Getting it evenly spaced and in length is a weak point for me. Each page was half of a full sheet (2 pages per sheet). The photos show what I mean. I used what little sizing information Maya provided, adding an extra 1/4″ on the outer edge. She blanket, er, buttonhole-stitched the raw edges of the fabric pages together. I wanted to sew mine. That is covered in part 2, the construction of the books.

With my slight change, each page was 10″ wide by 7-1/2″ tall. I bought 100% cotton tea towels. NOTE! The slightly cheaper store-brand towels are pure crapola. They may be the same thread count, but they were half of the weight of the slightly more expensive name-brand. The cheaper ones stretched on the hoop stayed slightly stretched and warped. Stitching on them was frustrating too. They are too thin to be a good base to learn upon for me. You, of course, can use what you want.
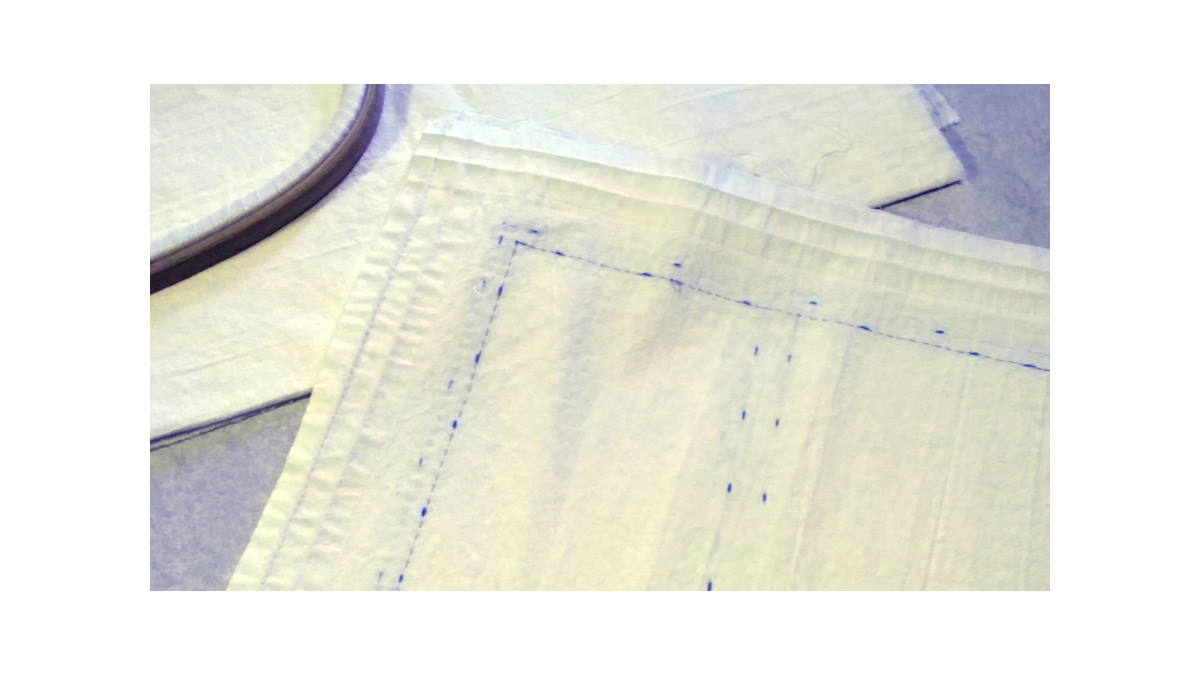
I washed the towels and removed the stitching of the edges to get the full size of the towels. I pressed them well. Pressed means that. Ironing by moving the iron around with pressure can stretch the material out of whack. I made a pattern for easy tracing of the correct size of my page sheet with thick card stock. I used a blue washable fabric pen to make the lines. I then measured and made the lines 1/2″ inside from the outer edge I had just made with a ruler, being straight-line drawing impaired. Finally, I marked out the 6″ tall by 4″ wide blocks 1/4″ in from the previous line with 1/2″ between the 2 blocks for the middle of the page sheet.
Not being an exciting task, I listened to audio-books while stitching around the first outer edge line in running stitch with white thread and the 2nd inner line with a pale blue thread. I did not stitch around the blocks for the stitch samples. This stitching was to ease finding the lines needed for finishing after making the samplers and rinsing in cool water to remove the pen lines. I got 6 page sheets per tea towel, by the way. I made enough pages to hold the amount I would need to fill with the stitch sampler book.

I kept one shelf from my old refrigerator when I realized it would make a great light table for tracing, being on a metal base that is taller in the back than the front. After taping a piece of paper with the layout design for two sampler blocks onto the glass, I taped the fabric, (I used blue painter’s tape), added a blinding light under the glass and traced the layout for each block with the blue washable fabric pen. Note: after penciling a design on the paper, go over it with a black felt-tip pen to make it easy to see for tracing onto the fabric. I need lines to stitch. Trying to get a straight line or circle was, well, yeah… See my photos above to see what I did.

I found an 8″ square-ish embroidery hoop and dressed it. I cut the tea towel into 6 pieces evenly to have as much material around the edges as possible. I ended up sewing three 5″ wide strips of cotton material into a “U” and would baste it onto the end of a page to have plenty of material for the hoop. I would remove the basted U-piece and would re-baste it to the other side when I finished the first block before putting it on the hoop. A frame-shape would have been smarter, now that I think about it. laughing… I was so into getting as many sheets per tea towel, I did not realized it made it hard to get a good amount of overhang for securing into the hoop. oops.

I ended up with 34 full pages, or 68 blocks/sampler pages. It sounds weird, I know. All of the stitches I used covered the full year of TAST stitches and covers the current year’s (2019) Beyond TAST challenge. I jumped ahead a bit.
Once I finished all of the samplers, I started on my plans to make them into books. This will be covered in Part 2. I am not happy with my photos of each full page of the finished books and may try to retake them. It is winter when I took them, making the lighting hard to get right. I may post them and redo the photos this summer.
I still thought this could be one book since I put 3 or more stitches per sampler block. Silly me. I ended up with 3 books. laughing…

I found some of the stitches a delight to stitch, some a challenge and some a real booger to get even close to looking halfway decent or correct. There are many stitches that are close enough to substitute a more pleasant stitch to work for ones that I could not get done neatly. I know, practice makes perfect, but if the stitch is displeasing to do, no amount of practice will make it look decent. I think the ones I had trouble with are the ones I did not care for the way they looked and the method was not smooth for me to stitch. I found I am not fond of satin stitches. One form used an outline to stitch over that helped me. I think a thicker thread may suit me better for doing that stitch if I need to use it. eh…
I should note: I used 3 threads of 6-strand floss for most of the stitch samples. I used #11 glass seed beads for the stitches with beads. I used 2 threads of the 6-strand floss for the stitch’s name. I know they are a bit wonky. I had a heck of a time following my print-letters most of the time. I made the stitch names too small for me to stitch or my handwriting sucks. I should have got fabric paint for the names. Hindsight is a wonderful thing.
If I had young children or grandchildren, the method of construction of the fabric books would work well if you wanted to make a special book for a child.
All in all, I enjoyed the whole project a lot. It was nice to quietly stitch in the evening. It became a form of meditation. Not a bad thing, really.


8 Comments
Peta
This is incredible! I am very inspired.
debreena
Cool! I hope you have a lot of fun with it!
Regina Fujan
I’d like to know what brand of towel you used and the size. Some I’ve seen tout 100% pure ring spun cotton construction, is that a good thing? I’ve also read that Flour Sack towels are much sturdier and more durable than tea towels.
I love the idea of the book and can’t wait to get started!
debreena
I think the material used is more of a flour sack than tea towel. They are 100% cotton, what kind, I have no clue. I got them at Walmart. I did not use the cheaper brand out of the 2 at the store. Those were too thin for use, ending up as dust rags. If you have a craft store or fabric store close, go for the tea towels/flour sack cloths one up from the cheapest. I used a seam ripper to undo all the hems while watching a movie. ;D Afterwards, I washed them in warm and dried warm to get full shrinkage. Ironed them using a water bottle sprayer. If I remember correctly, I got 6 full pages (being 2 pages with the fold, technically 12 pages) per cloth. It may of been 8/16… It has been a while. I explain that last bit in the how-to. I love being able to look at a stitch while designing so easily now. Have fun!
Asta
Hi i woud love to make these sampler embriodery books can i still access the tutorial where do i enroll i would realy love to make one they are gorgeous.
Asta
me
Her next round of TAST is on January 2024. It is free and you can sign up there! She has a free stitch dictionary to use while learning, which she references each week. TAST – PinTangle Her page for all of the stitches is at: PinTangle Stitch Dictionary
The book I made was based off reading Maya Matthew’s Million Little Stitches page. My method was a little more easy for me.
Have fun!
Deb
Andrea
I’m so inspired. How did you group your stitches? I saw the three books and the backs of the books….but what stitches from the stitch dictionary did you group together? Do you have that list somewhere to share?
me
I grouped them by type I found, I think, on the TAST site. There are variations of the types and they may be listed there. I just noticed some photos went into a portal and will re-upload them soon. sigh….
I will make a list and put it into a PDF this month and send it or post it here sometime this month.
Deb